
Change of Views / Predefined Views
In all steps, the user is given the opportunity to switch between predefined views to move the model to a defined position. A toolbar is displayed (7), representing the possible views with icons.
The zoom slider bar is also included within this toolbar, as well as the button to return to the center view.
This tool is always visible and located in the right toolbar.
Displaying and Hiding of loaded Components (Visibility)
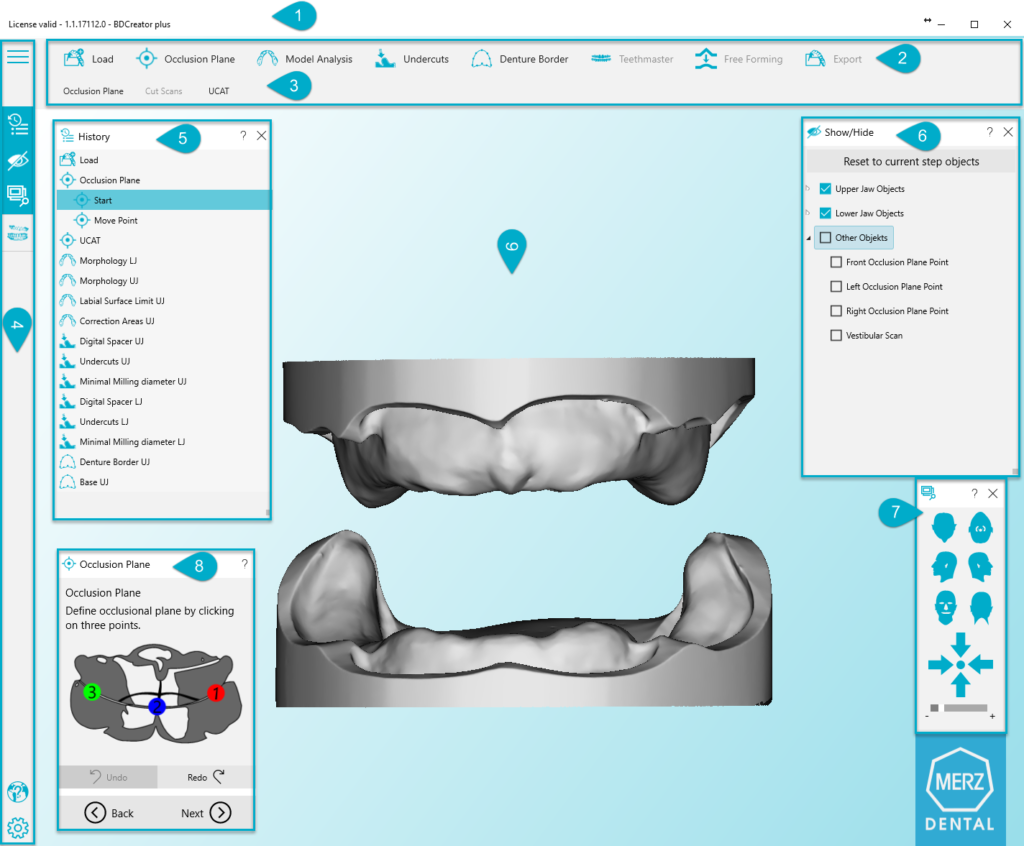
All loaded 3D objects can be displayed or hidden in all steps.
For this purpose, a widget is available (6) that lists all loaded 3D objects. For each step in the wizard, there is a defined number of meshes shown by default. If the corresponding checkbox is ticked, the object is displayed, if it is unticked, the object disappears. Moreover, meshes from previous steps are optionally accessible.
Additionally, the transparency of loaded objects can be controlled with a slider. The sketch shown here does not show the corresponding layout yet. Only one object at a time can have a transparency (<> 0 or 100).
All meshes are listed in a scrollable and checkable list; in contrast to this screenshot, the toolbar always has a slider visible when hovering the mouse over it.
For the final version, it is important that the widget has a tree structure, as above, where the different meshes are listed. Moreover, we need to be able to show several tree structures in order to group the meshes from different steps.
You can also choose “Reset to current step object” to get the initial visibility state of this step again.
The visibility tool can be opened by pressing the corresponding icon in the right toolbar. Use the same button to close it, if you don’t need it (toggle button).
The visibility tool is shown as a widget that can be moved around.
Backface Culling
If the angle of a jaw or other element leads to show the back side of a mesh, the mesh should not be shown. As soon as parts of the front are shown again when rotating the scene, the model should be visible again.
Views like this are never possible:
This setting can be set optionally via the checkbox in the Show/Hide tool. If not selected all objects are shown all the time.
V2: For the grouping of models the color code from the work params shall be used.
Top bar navigation
In the top bar, the user has the possibility to quickly switch between the main working steps. On clicking on a working step, the application reloads the last history entry of the respective working step.
We call the first line the breadcrumb and the second line the steps.
Wizard history navigation
In each wizard, the user has the possibility to navigate in the history with a couple of buttons.
– History navigation – “Clear”: Moves back to the first history step in the respective working step
– History navigation – “Undo”: Moves back by one history step (even across working steps)
– History navigation – “Redo”: Moves forward by one history step (even across working steps)
– History navigation – “Back”: Moves back to the last history step of the previous working step
– History navigation – “Next”: Moves forward to the last history step of the next working step
The history is used to make all changes persistent. That means that all changes that are made are stored on the disk.
So you can step forward and backward and therefore restore any older snapshot of the workflow.
You can open the history by pressing the corresponding item in the right tool bar. You use the same button to close it (toggle button).
The history is shown as a widget that can be moved around. Every breadcrumb and step are shown in the same order that the user has used them in. All changes are shown below the corresponding step.
If you are working on a project and switch back to an older snapshot, the newer snapshots are maintained. As soon as changes are made, a parallel history is created. As soon as you click the “Next” button, the now invalidated snapshots are deleted. A notification message will be displayed.
You may prevent the system from deleting the history by choosing to use stay at the current step. As soon as you select another snapshot in the history the intermediate changes are deleted.
All intermediate changes within one step remain until you press the “Next” button. Then intermediate changes from the previous step are deleted. You can go back to the initial or the final state of the previous step.
If you close the application and start the same project again later, it will continue exactly at the point where you left it.
Undo
Directly before the first change in a processing step, an undo file is created in a folder for the current case. The file name includes a time stamp, the processing step and the jaw type (mandible or maxilla). If mandible and maxilla are processed simultaneously in one step, two undo files with the same time stamp are created. If that undo step is recreated, files with equal time stamps are read in conjunction and the meshes are restored.
Furthermore, for each processing step and every change in a processing step (e.g. smoothing with strength 10, after that smoothing with strength 20) metadata are collected and stored as JSON data (strength for smoothing, transformation matrix, polygons etc.). This JSON data is initially stored in the file system.
When the application is terminated, the JSON file and the undo files remain. When the application is reopened again, the editing history for this case can be restored, so the user can continue his work exactly where he stopped before.
When you undo steps, the mesh, as well as associated metadata (strength, transformation, polygons etc.) are restored according to the data stored in this undo step.
As long as the model is not changed, it is possible to move back and forth in the history. If the model is changed, subsequent undo steps (that affect the same jaw) are deleted. For example, a realignment of the upper jaw does not remove steps in the lower jaw but certainly will delete subsequent steps in the upper jaw.
Each undo step has a name, like for instance in Photoshop or Word, so you can recognize what has been done within that step.
All processing steps for a jaw has to be done in a given order. For example, it is not possible to edit the base boundary for a jaw when stop areas have already been defined.
3D Mouse
3D mouse support is implemented based on HID technology. If you have a 3D mouse that supports the HID interface without installing appropriate drivers, this enhancement can be used.
The settings area provides the opportunity to define specifics for the usage of the 3D mouse:
The switch must be turned on to enable 3D mouse events.